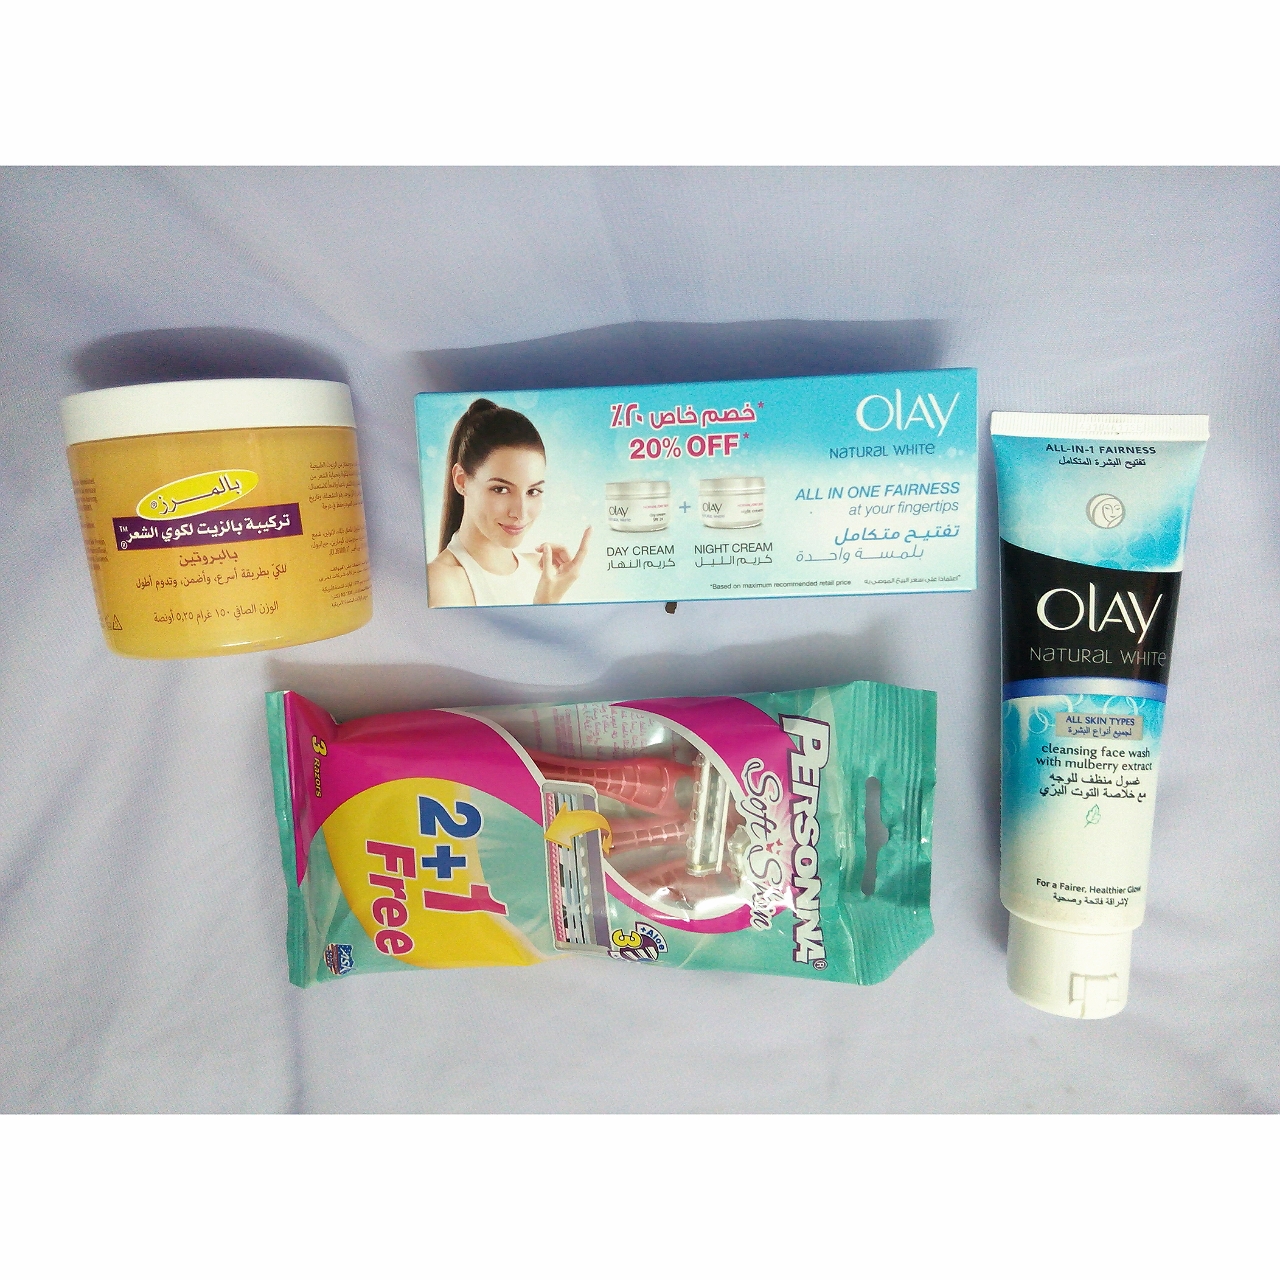
أهلاً..
مثل ماقلت في البوست اللي طاف إن بشرتي أنعفست عفاس من ضغط الأمتحانات وشغل الجامعة، فقلت أدلع روحي (ووجهي) وأسوي لي فيشل، لأنه يساعد في الأسترخاء وفي نفس الوقت ليه فوائد للبشرة، منها:
- أنه يحرك الدورة الدموية، وهذا يخلي البشرة أنها تتجدد و تصير صحية
- يشيل الأوساخ اللي تتجمع على الجلد وتسبب مشاكل في البشرة
- ينظف المسامات، وهذا يساعد البشرة تصير صافية، وماتطلع فيها حبوب، وبعد يصغر حجم المسامات
- يخلي البشرة نظيفه، وهذا يخليها تمتص منتجات العناية بالبشرة بطريقة أفضل
Hi..
Like I said in my previous post, my skin have been ruined due to all the stress from University, I thought I’ll treat myself (and my face) by giving myself a facial, Because it helps distressing and at the same time it have benefits for the skin, like:- It promotes blood circulation, which helps your skin to regenerate and be healthy.
- It removes dirt that accumulates on the skin and cause breakouts
- Cleans your pores, and that clears your skin, prevents breakouts, and reduce the size of your pores
- Cleanse your skin, which helps it absorb products more effectively
التنظيف العميق اللي بنسويه اليوم يتكون من 6 خطوات:
1. التنظيف
2. التقشير
3. البخار
4. القناع
5. الترطيب
6. معالجة مشاكل البشرة
The deep cleansing facial that I’ll be doing today consists of 6 steps:
1. Cleansing
2. Exfoliating
3. Steaming
4. Mask
5. Moisturizing
6. Treating Problem Areas
نبدأ؟
Should we start?
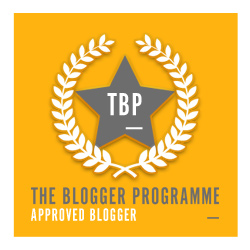
أول شي براويكم وجهي قبل
First I'll show you my face before


الخطوة الأولى: التنظيف
1. أعرفي أهمية تنظيف البشرة:
غسل الوجه يشيل كل الدهون، واقي الشمس والكريمات والمكياج، والملوثات اليومية اللي تصير على بشرة الوجه. وبعد يمنع تسدد المسامات، وبالتالي يقلل نسبة الإصابة بالبثور. وأخيرا تنظيف الوجه يساعد على تجهيز البشرة لتمتص المستحضرات اللي بتحطونها.
- غسل الوجه شي لازم تسوونه مرتين يوميا، حتى لو ماكنتو بتسوون تنظيف بشرة.
2. إرفعي شعرك عن وجهك بإستخدام ربطة شعر/تاج/شي جذي:
إغسلي يدك بماي وصابون عدل، وشيلي كل المكياج اللي في وجهك
- إستخدمي مزيل المكياج اللي إنتي مرتاحة عليه (أنا أستخدم مزيل المكياج من غارنييه للبشرة الحساسة)
3. إختاري غسول للوجه:
في واجد خيارات في السوق، وبمختلف الأسعار. خبيرات البشرة يقولون أن مو لازم تصرفين مبلغ كبير على الغسول، لكن اللازم أنج تشترين شيس يناسب نوع بشرتج
- كقاعدة عامة، الغسولات الجل والرغوة يناسبون البشرة الدهنية/المختلطة، والغسولات الكريمية تصلح أكثر للي بشرتهم جافة/عادية.
- أذا كنتي تعانين من حبوب الوجه، جربي إستخدمي غسول يحتوي على مادة الساليسيلك أسيد (Salicylic Acid) وأنا جربت هالشي، أستخدمت غسول من كليراسيل لما كان عندي حبوب في كتفي وذراعي من فوق، وألحين راحت خلاص وماردت تطلع :) السبب أن هالمادة تقلل(وتمنع) مشكلة الحبوب هو أنها تساعد على فتح المسامات المنسدة.
4. أغسلي وجهك:
بللي وجهك بماي دافي (دافي، مو حار) عقب حطي من الغسول في وجهك - حطي كمية مناسبة مو تشحنين وجهك، ولا تحطين أقل من اللي تحتاجينه) وأفركي بحركات دائرية، عقب إغسلي وجهك بماي ونشفيه، وطريقه التنشيف أنك تطبطبين علية بالمنشفة/المنديل.
- فرك الوجه بقوة لتنشيفه راح بسبب إحمرار وتهيج البشرة، وع المدى الطويل يسبب ترهلها.
First step: Cleansing
1. know the importance of cleansing:Washing your face removes all the oil, sunblock, skincare products, makeup, and daily pollutant that get on your skin. It also prevents clogged pores, which in turn reduce the likelihood of developing breakouts. Finally, cleaning the face helps preparing your skin to absorb the products you'll be using.
- washing the face is mandatory twice daily, even if you are not planning to do a facial.
2. get your hair away from your face using a hair band or something similar:
Wash your hand with soap, and remove all the makeup from your face
- use the makeup remover you prefer (I use Garnier Essentials Comfort make-up removing milk)
3. choose your face wash:
There are a lot of options in the market, with varying prices. Estheticians however, say that price doesn't matter, that means you can buy $1 cleaner and it would work the same way a $100 works. The most important thing is that it matches your skin type.
- As a general rule, gel and foam cleansers are more suitable for oily/combination skin, while cream cleansers are better used for dry/normal skin.
- If you have acne, try using a cleanser that have salicylic acid in it, I tried it (using Clearasil daily gel wash) when I had acne on my shoulders and upper arms, now it is gone :) the reason that Salicylic Acid reduces (and prevents) acne is that it cleans clogged pores.
4. wash your face
Wet your face with warm water, then use a pea-sized amount of cleanser on your face with circular motions, then rinse your face, and pat it dry
- Make sure you pat it dry, not rubbing it, because it will irritate your skin, and on the long run will make it sage.
هذا وجهي بعد ماغسلته، تلاحظون القشور اللي طلعت؟ هذا لأن مو كل الجلد الميت ينشال بالغسال بس
This is how my face looks after washing it, notice the flakes? it is because I still have dead skin on my face that can't be removed with only washing

الخطوة الثانية: التقشير
2. تعرفي على التقشير:
التقشير يساعد على التخلص من الخلايا الميته، اللي تسد مساماتك وتسبب الحبوب. بالإضافة لهذا، التقشير يفتح بشرتك ويخليها تلق، مقارنة بالبشرة اللي مو مقشرة اللي يبان مضهرها باهت.
- التقشير الصحيح و المنتظم يساعد بعد في أنه يخلي الشخص يبين أصغر لأنه يكشف طبقة جديدة، نضرة تحت طبقات الجلد القديمة الميتة.
2. إختاري المقشر:
في واجد منتجات تقدرون تشترونها لهالغرض، دوري شي مكتوب عليه مقشر أو صنفرة. إذا بشرتك دهنية أو معرضة للإصابة بالحبوب، ينصح بإستخدام مقشر يحتوي على الساليسلك أسيد (Salicylic Acid).
- أو تقدرين تضيفين شوية سكر للغسول وهو بيقشر.
- خيار ثاني هو أنج تخلطين سكر وزيت (أي زيت متوفر عندج يصلح - حتى لو زيت الطبخ ترى عادي).. بس ما أنصح فيه للتنظيف العميق لأنه يترك طبقة زيتية على وجهك. ("أنا أستخدمت تونر حق أشيل الزيت)
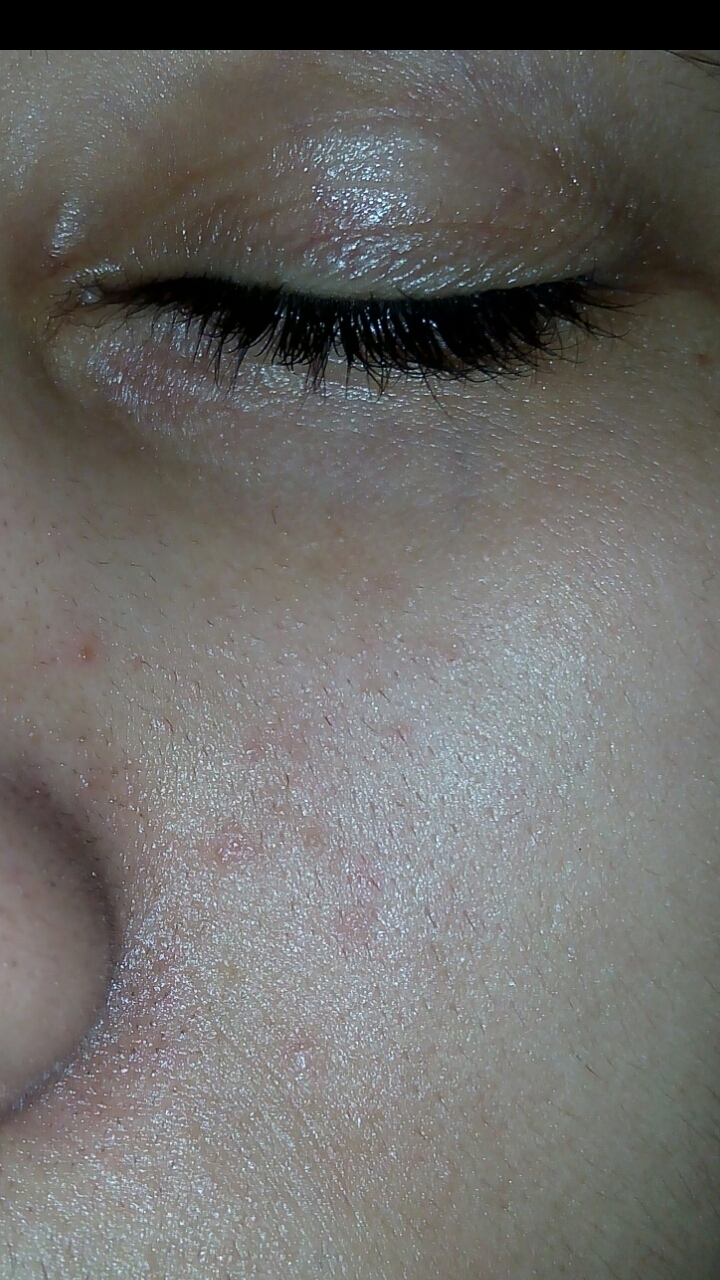
 |
| إذا حطيتي التونر في القطنة لفيها على الأصابع الوسطية بهالطريقة، يكون أسهل في الإستخدام |
3. إبدأي في التقشير:
بلطف وبرقة !! إستخدمي حركات دائرية خفيفة حق تشيلين الجلد الميت. إذا فركتي وجهك بقوة راح تهيجين بشرتك وتسببين ترهل المسامات (يعني المسامات تصير واسعة وواضحة). عقب أغسلي بماي وطبطبي عليه بمنشفة/منديل حق تنشفينه.
Second step: Exfoliating
1. Understand exfoliating:Exfoliating helps getting rid of dead skin cells that clog your pores and causes breakouts. Also, exfoliating brighten your face and make it glow, compared to non-exfoliated skin that looks dull.
- Moderate regular exfoliating makes you look younger because it reveals new, fresh skin under the old dead skin layers.
There are many products you can buy for this purpose, look for something that say exfoliator or scrub. If you have oily skin or acne-prone, it is recommended to use a product that contains Salicylic Acid
- or you can add some sugar to your face wash and that will do the trick
- Another option is to mix equal parts sugar and oil (any oil you like).. But I don’t recommend it for a facial because it leaves an oily layer on your skin.
 |
| when using toner, wrap the cotton pad around your two middle fingers, so it'll be easier to use |
Softly and gently!! Use circular motions to remove the dead skin. If you scrub vigorously, or else your skin will get irritated and cause your pores to sag (meaning your pores will get big and be more visible). Then wash your face and pat it dry with a towel/tissue.
ماكان عندي مقشر فسويت ليي واحد :)
I didn't have an exfoliator at hand so I made my own :)

1. حطي ملعقة من العيش (الأرز) في الخلاط الكهربائي
2. أخلطيها للين ماتستوي مثل الطحين بس خشنة
3. حطي فوقها ملعقة شوفان
4. أطحنينها في الخلاط للين ماتصير بودرة (لاتخلينها تصير بودرة ناعمة واجد)
1. start with 1 spoon of rice in a blender/food processor
2. blend it until it become grainy
3. Add one spoon of oatmeal
4. blend until it becomes powdery (not fine dust!!)

1. في طاسة صغيرة، حطي ملعقة من الخلطة اللي سويناها، ملعقة سكر، و ملعقة من زيت الألو فيرا (الصبار)
2. أخلطي كل شي مع بعضه عدل
3. حطيه في وجهك وإبدأي أفرطي بحركات دائرية خفيفة
1. in a bowel, add 1 spoon of the previous mixture, 1 spoon of sugar, and 1 spoon of Aloe Vera oil.
2. mix everything together
3. apply it on your face and rub in circular motions (gently)
الخطوة الثالثة: البخار
1. تعرفي على فوائد البخار للوجه:
إستخدام البخار للوجه ينظف البشرة، وينظف مساماتك بعمق لأنك تتعرقين كل الأوساخ والشوائب تطلع، من ضمنها البثور، الرؤوس السوداء.. إلخ. وبعد، البخار يرطب الطبقة العميقة والطبقة الخارجية للجلد، ويساعد في تقليص المسامات.
2. إغلي ماي:
بتحتاجين أن الماي يكون حار علشان يسوي بخار، يعني إغلي الماي في الغلاية/ غوري(إبريق الشاي)/ قدر المهم أنج تغلين الماي. عقب تقدرين تحطين الماي في وعاء أو في المغسلة المغسلة (سدي الفتحة اللي يروح منها الماي أول)، أو إستخدميه مباشرة من القدر. أنتظري بضع دقائق حتى يبرد الماي شوي علشان لاتحرقين وجهك.
- إذا بتحطين الماي في طاسة/بادية/وعاء بلاستك حاسبي أنه لازم يكون مقاوم للحرارة عن لا يذوب.
- تقدرين قبل لاتغلين الماي تحطين وياه بعض الإضافات، مثل:
- بضع نقاط من الزيوت مركزة (مثل: زيت اللافندر، زيت الليمون, زيت الورد، زيت الأوكاليبتوس…. إلخ).
- أو تضيفين له أعشاب (مثل: روزماري/إكليل الجبل، بابونج، زعتر، نعناع، قرفة…. إلخ).
- نباتات فرش (مثل: شرائح ليمون، أوراق ورد، ياسمين، شرائح برتقال، بقدونس… إلخ).
أنا أستخدمت ميرمية و زعتر :)
3. عرضي وجهك للبخار
خلي وجهك يصير فوق البخار مباشرة، لمدة 10 - 15 دقيقة، ولتحكيم البخار علشان يروح مباشرة لمساماتك وينظفها، حطي فوطة أو بطانية خفيفة فوق راسك تسوين فيها خيمة.
Third step: Steaming
1. learn the benefits of facial steaming:Steaming your face cleanse it, and deep cleanse your pores because you sweat all the dirt and impurities, including acne, black heads... etc. in addition to that, steam hydrates both outer and deep skin layers, and helps reducing the size of pores.
2. boil water:
You’ll need the water to be hot for it to make steam, so boil some water in a kettle/pot. Then you can put the water in your sink (make sure you plug the sink first), or you can put it in a bowl, or you can use it directly from the pot like I do. Wait a few minutes for the water to cool a bit so you don’t burn your face.
- If you are going to put the hot water in a plastic bowl make sure it is heat-proof so it wouldn’t melt.
- you can add some of the following stuff before boiling the water:
- essential oils drops (example: lavender, lemongrass, rose, eucalyptus.. etc)
- or add herbs (example: rosemary, chamomile, thyme, mint, cinnamon.. etc)
- fresh plants (examples: lemon slices, rose/flower petals, jasmine, orange slices, parsley.. etc)
Position your face directly above the hot water, for 10-15 minutes, and to trap the steam so it goes directly to your pores and clean them, place a towel or light blanket over you like a tent.
حطيت ماي في قدر وحطيت فيه الأعشاب (أعشاب مجففة في أكياس شاي)
I filled a pot with water then added my herbs (these are just dried herb in a tea bag)


وهذا وجهي بعد البخار، ماكنت متوقعه أنني بعرق لهالدرجة.. بس وجهي صار صافي صح ؟
And this is how my face look after steaming, I had no idea I'll sweat that much.. but my skin looks clear right?

الخطوة الرابعة: القناع
1. تعرفي على فائدة إستخدام القناع:
الماسك يساعد على تنظيف المسامات ويشيل الشوائب من البشرة. وبعد يرطب ويفتح ويشد، وواجد أشياء على حسب نوع القناع اللي أخترتينه.
2. إستخدمي القناع المناسب:
إذا بتشرين قناع، إذا كانت بشرتك دهنية ومعرضة للإصابة بالحبوب إستخدمي قناع فيه طين، مثل قناع الطين لتصفية البشرة من هيمالايا. إذا وجهك جاف إستخدمي قناع مرطب.
اليوم أنا أستخدمت قناع جاهز من فود أ هوليك بالرمان (بسوي عنه رفيو)، من الأقنعة الثانية اللي عجبتني قناع توني مولي (JYJ)
3. حطي القناع:
- وزعي الماسك على وجهك، وتجنبي منطقة العين والفم. خلي القناع لمدة 10-15 دقيقة (أو على حسب المكتوب على العبوة مالته). عقب إخذي منشفة رطبة، وشيلي بها الماسك. إذا حسيتي بحرقة أو وخز أو شي جذي وأنتي حاطة الماسك، شيليه في الحال لأن ممكن إن القناع ماناسبك وبشرتك قاعدة تتهيج أو قاعدة تتحسس من القناع.
- وأنتي تشيلين الماسك، لا تفركينه بقوة، إستخدمي فوطة مبللة علشان الماي يذوب القناع وينشال بسرعة بدون ماتحتاجين تفركين وجهك.
Fourth step: mask
1. know the benefits of using a mask:A mask provides extra cleansing for the pores and removes dirt from the skin. It also moisturize, brighten, tighten, and many more benefits depending on the type of mask you are using.
2. choose the right mask:
If you are going to buy a mask, for oily acne-prone skin use mud mask, like Himalaya Clarifying Mud Mask. If your skin is dry use moisturizing mask.
Today I used FoodAHolic Pomegranate natural essence mask, Another mask I recommend is TonyMoly Nutra-Energy Mask Sheet Review (JYJ)
3. Apply the mask:
Apply the mask to your face avoiding eye and mouth area. Leave it for 10-20 minutes (or depending on what it says on the pack). Then use a wet towel to remove the mask.
- If you feel burning, tingling, or something similar while you are using the mask, remove it immediately because it might be irritating your skin or you are developing an allergic reaction to it.
- While removing the mask, don’t rub it vigorously; use a wet towel to wipe it off so the water dissolves the mask, making it easier to remove.
هذا الماسك اللي إستخدمته
This is the mask I used

وهذا وجهي بعد ماشلت الماسك
This is after I removed the mask

الخطوة الخامسة: الترطيب
1. تعرفي على أهمية الترطيب:
الترطيب عنصر أساسي في أي روتين للعناية بالبشرة. لأنه يرطب البشرة ويخليها تبين صحية وناعمة ومنتعشة.
- الترطيب بعد له فائدة على المدى البعيد، لأن الترطيب هو اللي يخلي البشرة تؤدي وظيفتها بشكل ممتاز، يعني خلايا البشرة تقدر تصلح نفسها أسرع وتتجدد. وهذا له فايدة كبيرة في مقاومة التجاعيد على المدى الطويل. والدراسات أكدت أن الناس اللي يرطبون تطلع لهم تجاعيد بنسبة واجد أقل من اللي مايرطبون.
2. إختاري المرطب المناسب:
لازم ختارين مرطب على حسب نوع بشرتك، إذا كانت بشرتك دهنية، إستخدمي لوشنات أو جل أو إيمولشن (Emulsion) ( أنا أستخدمت اللي على أفوكادو من سكين فود، واجد عجبني بس مشكلته مافي منه هني، لازم تسوين أوردر أونلاين ☜ الموضوع الجاي راح يكون عن طريقة الشراء أونلاين)، لاتستخدمين مركب كريمي للبشرة الدهنية. لكن إذا بشرتك جافة يفضل أنك تستخدمين مرطب كريمي (أنصح في كريم الترطيب المركّز من هيمالايا)، لأنه يحتوي على نسبة أعلى من الدهون فيه. كل مازادت نسبة الدهن، زادت نسبة إمتصاص البشرة له ويرطب أنسجة الجلد الداخلية بعد.
- تجنبي إستخدام مرطب خفيف عقب ماتسوين فيشل/تنظيف للبشرة. لأن البشرة توها منظفة بطريقة عميقة ولازم تحصل ترطيب عدل. وإلا، قلة الترطيب راح تسبب أن وجهك يفرز دهون أكثر ويسبب تسدد المسامات، وحبوب وبثور.
- تقدرين تستخدمين زيت للترطيب (زيت اللوز، زيت الزيتون، زيت الجلسرين، أو شي جذي).
3. رطبي وجهك:
إستخدمي أصابعك برفق ودلكي بشرتك بالمرطب، تأكدي أنه المرطب وصل لكامل وجهك (وحطي في رقبتك بعد)
- إذا كنتي تستخدمين زيت، فطريقته أنك تحطين شوي في يدج وتفركينها حق يصير الدهن دافي شوي ويتوزع على يدك كلها، بعدين تحطين يدك على وجهك.. الصورة المتحركة اللي تحت توضح الطريقة
Fifth step: moisturizing
1. the importance of moisturizing:
Moisturizing is an essential part of any skincare routine. Because it hydrates your skin and make it look healthy, soft, and fresh.
- Moisturizing have a long-term benefits, because it helps you skin to function properly, which means that skin cells will repair and regenerate faster. That have an anti-aging benefits on the long run. Also, studies have shown that people who moisturize develop wrinkles at a fraction of the rate from those who doesn't.
2. Choose the right moisturizer:
you have to choose a moisturizer that suits your skin type, If you have oily skin, use lotion or gel or emulsion (I used skinfood Premium Avocado Rich Emulsion, I really liked it but the problem is that you have to order it online), don't use cream moisturizer for oily skin, however, if you have dry skin, using a cream type moisturizer is encouraged (I recommend Himalaya Intensive Moisturizing Cream), because it contains more oil. And the more the oil, the more your skin will absorb it, and it'll moisturize your skin tissues.
- Avoid using light moisturizers after doing a facial. Because your skin have been deep cleaned and it needs to be moisturized. Or else, your face will produce more oil and clog your pores, and cause acne and pimples.
- You can use oil (Almond oil, olive oil, glycerin oil, or anything you like).
3. moisturize your face:
Massage the moisturizer on your skin with your fingers, make sure the moisturizer reach every part of your face (and your neck too)
- If you are using oil, apply some on your palm and rub it together, that will warm the oil a little and distribute it on your palm, then place your hands on your face.. the following gif will demonstrate it
 |
| هذي طريقة ترطيب الوجه بالزيت |
حق الترطيب أول شي إستخدمت كريم الليل باللافندر من ناتشر ريببلك، وحطيت فوقه كريم إصلاح البشرة خلال الليل من جرجنز
To moisturize, I first used nature republic sleeping tonight lavender pack, them applied Jergens overnight repair on top of it
 |
| أدري الصورة مو واضحة، تلفوني مبند بدون جارج ماقدر أرد أصورها I know the picture is blurry, but my phone battery is dead so I can't take another one |
هذا وجهي بعد مارطبته
This is my moisturized face

الخطوة السادسة: علاج مشاكل البشرة
1. الرؤوس السوداء:
الرؤوس السوداء هي مسامات مشحونة بالأوساخ اللي على البشرة و الدهون التي تفرزها البشرة. الرؤوس السوداء هي عادة سببها أن البشرة تكون افرزت دهون واجد. ولكن بسبب أن المسامات ما تتنظف، الدهن يتجمع في المسام و مع الوقت و تعرضه للأوكسجين، الدهن يتأكسد و يتغير لونه من الاصفر للأسود. اذا لاحظتي أن عندك واجد رؤوس سوداء، تقدرين تتخلصين منها بإستخدام اداة إزاله الرؤوس السوداء
- أداة إزاله الرؤوس السوداء مفيدة لان فيها دائرة حديد تقدر توصل لأماكن واجد أصابعك ما تقدر توصل لها (مثل جوانب الانف). خلي الراس الأسود يصير داخل الدائرة و اضغطي عليه بالأداة (بس شوي شوي مو تعورين روحك) و إنتي ضاغطة إسحبي الدائرة على الرأس الاسود و بتطلع الاشياء اللي داخله كلها.
- دائماً نظفي الاداة بالكحول قبل و بعد استخدامها.
2. الرؤوس البيضاء:
مثل طريقة الرؤوس السوداء، هي أوصاخ و دهون متجمعه في المسامات، و لكن الفرق أن المسام مسدود فالأوصاخ تتجمع و تتجمع بس ما تقدر تطلع و ينتفخ المسام، و لأن مايوصلها أوكسجين ما تتأكسد ولا يتغير لونها.
- طريقه التخلص منها مثل طريقه الرؤوس السوداء بالضبط، بس حطي بالك ترا من الضغط تنفجر= قرف. و ممكن بعد يطلع منها دم (دائماً يطلع منها دم ) من تخلصين نظفي الدم بمنديل و حطي فوقه معقم (أنا استخدم بيتادين و مرتاحة منه. لا تخافين إن لونه أصفر ترى ما يصبغ و من يصيدة الماي يطير) أو تقدرين تحطين لصقة.
الصورة اللي تحت تبين الفرق بين الرؤوس البيضا والسوداء

3. الحبوب و البثور :
إستخدمي علاج موضعي (يعني يستخدم على الحبوب بس مو على الوجه كامل)، تقدرون تشترونه من الصيدليه أو تسوونه في البيت. حمض السالسيليك Salicylic Acid هو واحد من أكثر العلاجات التي تستخدم على الحبوب لأنها تشتغل على تنظيف المسامات المسدودة من الخلايا الميته التي تسبب الحبوب. مادة بنزويل البيروكسيد (Benzoyl peroxide) بعد تستخدم لهالشيء لأنها تقتل البكتيريا التي تسبب الحبوب و الالتهابات التي تصير فيها بسبب البكتيريا.
- من المنتجات اللي أنصح فيها للحبوب هي منتجات كليراسيل، كريم التفاحة من بافيفات (هذا مو كريم توني مولي اللي ينباع في الانستا)، سيروم الـ3 ثواني من هوليكا هوليكا بالفيتامينات.
- إذا تبين تستخدمين منتجات طبيعية، تقدرين تستخدمين زيت شجرة الشاي و هو يعتبر مضاد للبكتيريا و الإتهابات، و هو ممتاز للي بشرتهم حساسه لانه ما ينشف البشرة
- خبراء الجلد ينصحون باستخدام العلاجات الموضعيه بشكل معتدل، لأن الأستخدام المفرط يسبب الإحمرار و ينشف الجلد و يخليه يتقشر، فحاسبو لا تحطون واجد.
Sixth step: Problem area
1. blackheads: Blackheads are pores filled with dirt and sebum (oil). Typically, blackheads are caused when your skin overproduce sebum (oil), but because the pores are not being cleaned properly, the sebum accumulate inside your pores, and with time and oxygen exposure, it oxidize and change colour from yellow to black. If you notice that you have a lot of blackheads, you can extract them with a blackhead extracting tool.- Blackhead extracting tool is very useful, because it can reach where your fingers can't (side of the nose). Position the blackhead inside the circle and press (gently, don't hurt yourself) then move it across the blackhead and that will release all the gunk.
- Always clean the tool with alcohol before and after each use.
2. Whiteheads:
Just like blackheads, it is dirt and sebum clogging your pores, the only difference is that the opening is closed, so it accumulates in the pores and swell, and since oxygen doesn't reach it, it doesn't oxidize so it doesn't change colour. - you can remove it the same way you remove a blackhead, Just keep in mind that pressure might cause the whitehead to explode = Eww. Also it might bleed a bit (it almost always bleed), so, after you finish extracting clean the blood with a tissue then apply antiseptic (I use betadine, don't worry about its colour, it doesn't stain the skin and it washes with water) or you can apply a band-aid.
The picture below shows the difference between a whitehead and a blackhead.
 |
- some of the product I recommend is Clearasil products, Baviphat Apple AC Therapy Sleeping Mask, Holika Holika 3 seconds Starter Vita Complex.
- If you prefer using natural products, you can use tea tree oil which is an antiseptic and anti-inflammatory, and it is good for people with sensitive skin because it doesn't dry it.
- dermatologist recommend using spot treatment moderately, because over using it can cause redness and irritate the skin, and cause it to flake, so be careful.
 |
| (هذي أداة التخلص من الرؤوس السوداء/البيضاء، خذيتها من الشاهين (محل أبو ربيتين This is the blackhead/whitehead extracting tool |
ملاحظات أخيرة:
- وجهك يمكن مايصير في أبها حلته أول ماتخلصين، بس أتركيه يرتاح شوي وبتشوفين النتيجة.
- بعد الغسيل و التقشير الحبوب راح تبين أوضح، وهذا طبيعي لأن إحنا شلنا الجلد الميت اللي كان مغطنها
- مو كل الحبوب/الرؤوس السوداء/الرؤوس البيضاء تقدرين تشيلينها، فإذا ماإنشالت خليها و إرجعي لها بعد إسبوع. لأتقعدين تحاولين فيها وتجرحين بشرتك لأن تالي يتم أثر ما يروح
- إذا كانت عندك حبوب كثيرة أو ملتهبة أو بشرتك حساسة لا تحوسين فيها، روحي لإختصاصي يفحصها
- بعض الرؤوس السوداء/البيضاء راح تبتدي تفرز دهون صفراء يوم ثاني( مايبين إلا إذا ركزتي عليها)، وهذا عادي لا تحكينها أو تحاولي تقشرينها، خليها وبتروح بروحها
- وجهك راح يبدي يدهن أكثر من قبل يوم ثاني، هذا معناه أن بشرتك تنظفت صح، ولا تخافين أو تحاتين أن بشرتك إختربت، التدهين مابيستمر على طول، بياخذ له تقريبا من يومين لإسبوعين.. أهمشي أنج ترطبين وجهك ( أدري بتفكرون أنه قاعد يدهن و المفروض ما نرطبة، لكن هذي فكرة خاطئة) أنتي كل ما رطبتي بشرتك كل ما قل إفرازها للدهون، ليش؟ لأن البشرة تفرز دهن علشان لايصيدها جفاف، فهي تفرز أزيد من اللازم لأنها تحاول تحمي روحها من الجفاف (وسواسية ههه) وأنتي كل ما رطبتيها هي ما بتخاف أنها تجف فبتقلل من إفرازها للدهون (ترى من صدقي أتكلم، جربي).. طبعا النتيجة حق تبين تاخذ لها إسبوعين تقريبا.
- إعطي وجهك يوم راحة بعد التنظيف، مايحتاج تغسلينه الصبح (أقصد مايحتاج صابون، بس إغسليه بماي) ولا تحطين مكياج ولا كريمات ولاشي، بس إذا بتطلعين من البيت حطي واقي شمس مهم جدا.
- التنظيف العميق يتسوى مرة وحدة بالشهر مو تقعدين تسوينه كل يوم وتالي تقولين إخترب وجهي، ترى كل شي إذا زاد عن حدة إنقلب ضده.
- بعد يومين من التنظيف بدي روتين العناية بالبشرة علشان تتم البشرة نظيفة.
Final notes:
- your face might not look at it's best when you are done, but if you let it rest for a few hours ~ day it'll look amazing.
- After washing and exfoliating, your acne and other red spots will be more obvious, the reason for that is we removed the dead skin layer that was covering it
- You might not be able to extract all the acne/white heads/blackheads, so don't try to extract it forcefully because you might injure your skin and that will results in scarring. Just leave them for a week, then try to extract them again.
- I you have bad breakouts or inflamed acne, do not attempt to extract anything, please go see a dermatologist.
- - some blackheads/whiteheads will start producing oily yellow sebum, that will form a layer on the pore entrance (it is not obvious unless you pay close attention), and that is normal, just don't pick at it, it will go on it's own
- your face might start to get oilier than it used to be, that means your skin have been deep cleaned, don't worry about it because it is not going to last long, it'll take from 2 days to 2 weeks for your skin to get back to normal (or better).. Just make sure you moisturize it (I know you might be thinking, even if it is oily you HAVE to moisturize it) the more moisturized your skin is, the less oil it will produce, the reason your skin is overproducing oil, is because it is trying to prevent itself from drying (your skin is OCD lol). Whenever you moisturize it, the more save it will feel , it won't worry about drying anymore, so it'll stop producing that much oil.. of course it'll take around two weeks for you to see result.
- give your face a day off after the day you do the facial, don't wash it in the morning (I mean don't use face wash, but it is okay to wash it with just water), don't wear makeup or apply any product to your face (including skincare products)
- Deep cleaning facial should be done no more than once a month, doing it more than that'll ruin your skin.
- After two days, start a skincare routine so your skin will stay clean and healthy
وهذي النتيجة النهائية (يوم ثاني)
And This is the final results (The next day)


صح أن مو كل الحبوب اللي في وجهي راحت، بس وجهي أحسن من قبل وأستانست بالنتيجة ♥I know that there are still some imperfections, but I am happy with the end results
♥
If you like my posts show me your support, by following me on my Social Media below:
إذا أعجبتكم مواضيعي إدعموني وتواصلو معاي عبر الوسائل التالية :
 |  |  |  |  |  |  |